Introduction
The quality of video journalism by newspapers has dramatically improved in the past few years. Yes, you read that right. Newspapers are producing some of the best video journalism in the U.S. and around the world. Instead of being broadcast on television, however, most of these video stories are published on the Web.
The advent of (relatively) cheap digital video cameras and free video-editing software has leveled the playing field just as the Internet did with text publishing. Instead of a $35,000 camera, an expensive editing station, a two-person crew and years of training, one person can produce high-quality Web video with a $500 camera and a laptop or desktop computer.
Instead of a $35,000 camera, an expensive editing station, a two-person crew and years of training, one person can produce high-quality Web video with a $500 camera and a laptop or desktop computer.
As a result, some TV news companies are breaking up traditional news teams and creating VJs—video journalists. Also known as “backpack journalists,” they work solo and serve as both reporter and videographer on assignment.
The lower entry barriers also have influenced secondary education. Around the U.S., thousands of high school and junior high students are receiving formal training in shooting and editing video at school. Those that go on to journalism school will graduate with a broader array of skills than most of the journalists working today.
David Leeson, a Dallas Morning News photographer who shared a 2004 Pulitzer Prize, wrote a passionate plea for diversification of skills on the SportsShooter Web site in November 2006. In it, he compared the newspaper industry to a distant aunt visiting a reunion for the first time in 25 years.
“Last time you saw her you were sitting in a booster seat. Today she appears a tad smaller than before and marvels at how big you’ve become. Video was a child when most of us first picked up a 35mm. Now, video is all grown up and on its way to becoming a powerful storytelling tool.”
“If you had the skills in video today—there would be a very long list of opportunities before you,” Leeson wrote. “To move forward in life requires a measure of risk. There is no greatness outside of risk. The future of the traditional newspaper is looking pretty risky these days but the health of solid visual reporting is getting stronger every day by those of us who value visual journalism and ethical storytelling above and beyond a 35mm.“1
These next chapters will help you understand the basic concepts of shooting and editing digital video with enough step-by-step instruction that you will be able to pick up a camera and shoot footage then edit it and publish it online. It’s that easy.
Digital Video Cameras
Those grainy home videos you watched as a child are long gone. Digital cameras have done to video what CDs did to old record albums. By storing video as digital bits on a mini-DV tape, compact and portable cameras are able to collect and store much more data than analog tape, greatly improving the quality and making editing a breeze.
 Digital cameras can be separated into two types: 1 CCD and 3 CCD (CCD = charge coupled device). These measures tell you whether the camera has one computer chip or three computer chips. Cameras use these chips to process color and, as you might suspect, having three is better than one. As a result, 3 CCD cameras produce much higher quality video but are also more expensive. A 3 CCD camera costs $1,500-$5,000 while a 1 CCD camera can be had for less than $1,000.
The additional quality of a 3 CCD camera is not really necessary for basic Web video (since the files are compressed to speed up the download time) but that quality is required for TV. If you ever want to make a DVD and watch it on a flatscreen plasma TV, a 3 CCD camera will make all the difference.
Tapes, batteries and other accessories
Several hours before you need to use the camera, check to make sure the battery and back-up battery (if there is one) are completely charged. Most cameras come with a standard battery that won’t cut it for many professional uses because it lasts less than an hour. If possible, purchase the largest capacity battery available for your camera and then use for back-up the one that came with the camera. A three-hour battery is available for most cameras.
Also, check to make sure you have enough mini-DV tape for the assignment plus a back-up tape in case you need more than you originally anticipated. Tapes can be re-used, which is nice since they’re not cheap (about $7 for a 60-minute tape).
While a charged battery and ample tape are the most important accessories you’ll need for your shoot, there are many others to consider, including external microphones (see Chapter 7: Digital Audio), external lighting devices, a tripod and headphones.
Tripod: The easiest way to make your videography look professional is to always use a tripod. A steady shot is essential for quality video and, even though many cameras have fancy “image stabilization” features built in these days, nothing will provide a rock solid shot like a tripod. That said, developing a steady hand is necessary if you’re going to start branching out and doing different types of shooting.
All cameras have a round (usually silver) hole on the bottom with circular threads. All tripods have a round (usually silver) bolt-like stem on the top. All you have to do is place the camera on top of the tripod so the stem matches up to the hole and then turn the dial below the stem until the camera is tightly affixed to the tripod.
Headphones: As we will discuss later, audio is essential to video. And the only way to be sure you are recording good audio with your video is to plug in a pair of headphones and listen while you shoot. All cameras have a headphone jack; simply plug in the headphone cord.
If it’s not practical to use headphones during the shoot, use a co-worker or the subject to test the audio while setting up the camera to check the audio level. Simply talk to them while wearing the headphones to make sure the mike and sound are working correctly.
Lighting: If you have ever “shared” an interview with a cameraman from the local TV station, you probably thought, “Why do they have to use that spotlight? It’s blinding the person talking.” There’s a good reason. Just as still photographers need a flash in almost all indoor settings, powerful lighting is essential to shooting video.
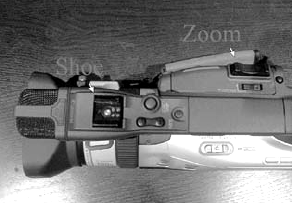
The “shoe” is where you connect an external device such as a light or shotgun microphone. The “zoom” rocker bar lets you zoom in on, or away from, your subject.
There are several options for lighting, spanning various price ranges. Most clip into a “shoe” on the top of the camera. As with most photography equipment, the better products are more expensive. In this case, more powerful lights are brighter and give off more even light. So if you don’t have access to the big, bright lights that TV people use, look for a more “entry-level” version for around $100.
Or do as I did covering the Super Bowl in 2006: Stand next to a TV cameraman and mooch off his light.
NOTE: Running a light—especially a powerful one—will increase the drain on your battery, so having a back-up battery is even more important.
Zooming, focusing and exposure
Digital video cameras all come with convenient automatic features as the default settings. Unless you’re a “camera person,” you probably won’t ever switch to manual settings. And that’s fine; let the camera do the heavy lifting for you.
Focus: The automatic focus feature means that when you turn the camera on, it will automatically focus on whatever you’re pointing the camera at. This will suffice for most of your shots. The only time it might not be good enough iswhen you are shooting something complicated where there are multiple subjects moving within the frame. Still, the automatic setting will probably produce a better picture than you could using the manual focus dial unless you already have photography skills.
Zoom: Most new cameras have a powerful zoom that is easily manipulated with a rocker button on the top of the camera. Set the zoom before beginning to record and then only zoom when absolutely necessary—and as slow as possible. If you are shooting someone talking, don’t zoom at all. Ever. If you want to have different angles and compositions, do separate shots.
Exposure: Most cameras also come with automatic exposure, which will give you the appropriate lighting in most circumstances. If you are shooting in especially low light, try switching to manual exposure and allowing more light (this will open up the iris). Check the operating manual for information specific to your camera.
Get good audio
One part of the equation that is easy to overlook when shooting video has nothing to do with the picture. The quality of the audio is critical to producing good video, even more so for online video since the size of the video picture will be relatively small.
The quality of the audio is critical to producing good video, even more so for online video since the size of the video picture will be relatively small.
Natural sound and environmental pictures are also important. Remember to record “blank” shots of a story’s location or setting. Think of the standard “60 Minutes” piece: It shows the outside of a building where the subject works, then cuts to a shot of the subject walking up the street or answering phone calls in the office.
The best way to ensure the quality of the audio will enhance, not sabotage, your video project is to choose the best microphone for the assignment. Here are the options:
Built-in mic
All digital cameras have built-in microphones that will capture the audio sufficiently if you are shooting video and want “natural” or “environmental” sound. Think sporting events, fairs and festivals, and the like.
Wireless mic
A lavalier, or wireless, microphone is an additional accessory that is essential to purchase if you want to capture interviews on video. Here’s how to use one: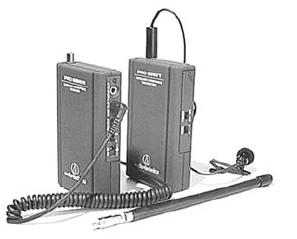
- A tiny mike on a clip is clipped onto the lapel of the subject. This mike is wired to a transmitter that can be clipped on the subject’s belt or placed in a pocket.
- The receiver is then connected to the camera by plugging the cord into the jack marked “mike” (or it might have a small icon that looks like a microphone).
- Turn both units on—the transmitter and the receiver—and test the signal strength by using headphones and asking the subject a couple of “small talk” questions. If the signal isn’t strong, turn up the levels on both devices. If that doesn’t work, look for a better place to put the mike, one that’s closer to the subject’s mouth.
Note: Remind the subject that the mike is sensitive and to avoid adjusting clothing during the interview or there will be loud scratches.
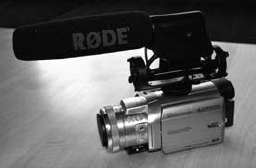
A shotgun mike on a camera.
Shotgun mike: Another accessory, a shotgun mike, is the best choice when you are hoping to capture a conversation among several people. To place wireless mikes on more than one or two people will make the sound unrealistic and too “out front.” (Plus, you may not have access to a half dozen wireless mikes.)
There are two types of shotgun mikes: Smaller ones that attach directly to the camera and larger ones that attach to a boom. If you have the on-camera version, slide the mike into the “shoe” on the top of the camera. The camera will recognize the accessory and automatically switch from its built-in mike to the shotgun mike.
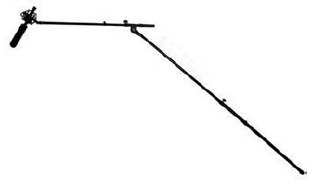
A shotgun mike on a boom.
A larger shotgun mike will probably be wireless and have a transmitter and receiver. You will need a boom—an extendable pole with a microphone clip to hold the mike—and someone to hold it near the subjects (you have a sound crew, right?). But not too close, or you’ll end up with a video that has shots of the mike poking in from the edges.
Shooting still images
Most new digital video cameras have the ability to take still photographs, too. This will come in handy for shooting a “screenshot” or a mug that can be used in print to tease to the online video package or on the Web site as a promotional icon.
So-called “citizen journalists” are increasingly using their mobile phones to capture video if they witness a news event. They may upload these videos to hyperlocal sites or they may send one to a news organization that welcomes on-the-scene reports.To capture mobile video you need, of course, a mobile device that can shoot video. Many cell phones are now equipped with USB ports that allow you to connect your phone directly to your computer so you can transfer your video and edit it. If that’s not an option, you can also e-mail the video to yourself and then edit it.To e-mail video, your cell phone must be able to send MMS (Multimedia Message Service) messages and have an Internet access or data plan from your mobile service provider.Increasingly, news sites are inviting people to send them raw video footage, especially of breaking news. CNN.com’s I-Reports and the video-hosting site YouTube invite mobile videographers to upload their videos directly from their cell phones or PDAs.You must create an account. This will give you an e-mail address where you can send your videos. Then you can e-mail your video as an attachment.
Switch the camera mode to Card mode instead of Tape mode (if your camera has this option). This will change the recording source from the DV tape to the portable storage card that your camera uses, such as a Secure Digital (SD) or Compact Flash (CF) card.
To capture a photo, use the button marked “PHOTO” instead of using the red (or other) button that is used to begin a recording. You can (and should) use the regular zoom.
Shooting the video
When you’re starting out, there are essentially two types of video assignments: A documentary-style video story and a breaking news/highlights/news clip style. Either form requires you to approach it with more than an attitude that you’re “just getting some video.” With a little more effort and planning, you can capture and produce great video, no matter the form.
Documentary-style video story
The best way to make a solid video story is to think about it the same way you think about writing a story. Indeed, it’s critical to think about how the video will “tell the story.” Once you envision what the story should “say,” it’s simply a matter of filling in the spots with the most appropriate footage. Here’s how.
Plan the shoot before you go out: Just like the elements of a good news story that are second nature to you (background, quotes from more than one source, documentation), there are basic elements of a shoot you will need to construct an interesting video story. You need a mix of shots:


Wide-angle—These shots, also known as “establishing” shots, give viewers a sense of the environment, so shoot the outside of the building or back up and shoot the entire room.
Medium—Somewhere in between wide and close-up, these shots are the ones you are probably most comfortable shooting.
Close-ups—These shots zoom in on who’s talking or what they are talking about. Remember: Always zoom first, then record, instead of recording and zooming at the same time.
A good mix would be 25 percent wide-angle, 25 percent close-ups and 50 percent medium or mid-range shots.
Breaking news/highlights/clips style video
For these types of video, you rarely know what the “story” will be in advance. You simply know that news is happening or has happened and you want to capture some essence of it on video.
For a breaking news event like a highway crash or a school shooting, you probably won’t get to the scene in time to capture the actual action. However, the reaction from witnesses and investigators as well as footage of the scene are well worth capturing.
Press conferences (if they are tied to compelling news events or delivered by news figures) can make good video and are about the easiest to shoot. You have a fixed subject and the lighting will be good (especially if there are TV cameras around).
Highlights clips, especially in sports, can be among the most popular content on any news site. Shooting sports video can be challenging, however. The constant movement of the subjects requires large capacity in the digital video file and can be hard to follow once the video is downsized and compressed for Web display. As a result, short clips of the best action is the way to go, either edited together with voice-over descriptions or linked to a news story as raw clips with caption information next to the link.
Other important tips to remember:
- Be selective in shooting. There are two good reasons for this: You don’t want to waste tape and you don’t want to waste time editing.
- Avoid panning, zooming. Stop recording when switching between wide, medium and close shots. Avoid zooming and panning if possible. Simply shoot a shot, stop recording, then adjust for the next shot and hit record again.
- Hold your shots. Since you can make a shot shorter in the editing process—but not longer—make sure to hold each of your shots for at least 15 seconds. Even if it’s a wide environment shot that you’ll likely use for 5 seconds, shoot the full 15 seconds. You’ll be glad you did.
- Be silent when you shoot. The camera will pick up every sound you make—a sigh, a cough, a chuckle or anything you say. So keep your lips zipped when recording because you won’t be able to edit out the unwanted audio later.
-
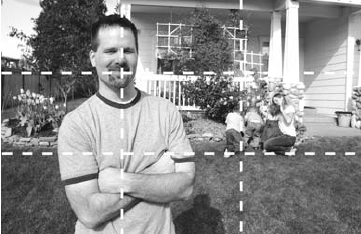
The gridlines show you how to compose video using the “rule of thirds.”
Frame your subject carefully. When framing your shot, it is best to avoid a static composition by keeping the main subject slightly off center. To do this consistently, follow the “rule of thirds,” which recommends dividing the frame, using imaginary lines, into thirds both horizontally and vertically. If you position your main subject (usually a face) near one of the intersections of these lines, you will achieve a pleasant, active composition.
Seek the best short clips. Understand that the best video stories are comprised of many short clips edited together, and your job is to get the best short clips. The best way to fully comprehend the array of clips you need to capture is to actually perform the editing—or at a minimum sit with the person who edits the video. It’s the only way to see what types of clips you shot work best and what types of clips you missed.
If you shoot video footage and hand it off to a Web producer or multimedia editor to await the final product, your video story skills will never improve.
As simple as it gets
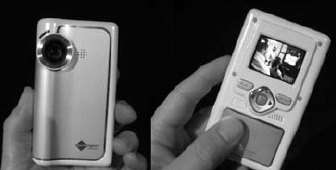
Pure Digital video camera.
A company called Pure Digital has released a new line of video cameras that make shooting basic video as easy as recording a conversation on an old microcassette recorder. The device is small and basically “idiot-proof” since it only has buttons for play, record, stop, forward and back. It has to be hand-held and doesn’t zoom, so it’s only appropriate for basic videography, like shooting the subject of a story so the audience can see and hear the person talk and sense their personality.
“Was this video compelling? Not particularly, but it wasn’t bad. It provided a voice and face to the story, and it offered a multimedia element. It was no worse than what most local TV news stations offer at 6 and 11 p.m. Perhaps of greatest significance, our newsroom embraced this technology in record time: 2.5 hours!”
The Tri-City Herald in Washington state purchased one of the cameras in January 2007 and deployed it within a couple hours. A reporter shot a video interview and published it on the site the same day. Web site director Andy Perdue had this to say about the trial:
The version of the Pure Digital camera that holds 30 minutes of video sells for $129 at national retailers like Target and Best Buy (as of January 2007). There is also a 60-minute version for $179. “We plan to purchase one or two of these per month throughout the year and deploy them in our bureaus as well as in the newsroom,” Perdue said.
Do a trial run
If you are interested in learning to shoot video, get comfortable before heading out on assignment. Shoot some footage at home of your family or friends and experiment with different types of shots. Practice capturing a mix of shots, using different types of microphones, using a tripod and lighting. Shooting basic video is not difficult but, like most new technology, takes some getting used to.
Assignment:
- Watch your favorite local TV news station.
- Try to mimic shots you find effective.
- Compare news stations.
- Look for the rule of thirds.
- Be a critic; it will help you improve.
1. David Leeson, “Preserving our Vision,” Sports Shooter, November 16, 2006. David Leeson is a staff photographer for The Dallas Morning News who has covered conflicts and wars all over the globe. In 2000 he began shooting video for The Dallas Morning News, becoming one of the first photographers shooting video for a newspaper on a full-time basis.