Introduction
Now that you’ve captured great video on your camera (or cell phone), it’s time to prepare it for others to see. While many of the digital skills you will learn in this book are “platform agnostic”—meaning they look the same no matter what type of computer you are using—editing video will be different for those using Mac computers versus those using a Windows machine.
We will detail the basic editing process mostly using iMovie for the Mac and Windows Movie Maker for the PC. Why? Because both are free, and one is probably already installed on your machine. And both are easy to use and accomplish the basic tasks you need.
The magic of digital video is the simplicity with which you can rearrange the order of your clips. It’s unlikely you’ll want to create a video story that plays the footage in the exact same order that you filmed it, so editing and arranging the clips will allow you to present the story just the way you want.
In addition to deciding on the sequence of your clips, you’ll need to decide whether you want to add such things as music or narration to tell your story.
Good audio will make all the difference to your video, but you’re not relegated only to the audio that is on the videotape. iMovie and Movie Maker make it easy to import music files or voice-overs and place them exactly where they’ll have the most impact on your video.
Voice-overs can be especially helpful for video footage with lots of noise. Think of a high school basketball game where a game-winning shot sends the crowd into a frenzy. A voice-over can explain who made the shot and tell you the final score. The frenzied crowd can still be heard, but the level has been lowered so as not to interfere with the narrated information.
Voice-overs can be especially helpful for video footage with lots of noise.
Both iMovie and Movie Maker will also give you various options for transitions, which allow you to control how one clip evolves into another. Without transitions (such as fading into/out of a shot), each clip will have a hard cut and that is fine, and even desirable, for news stories on video. Avoid overly fancy transitions, which can make your story look amateurish and silly. Leave those features for the home movies.
You may also want to add titles so you can identify speakers in your video or publish credits at the end of the clip. You can use the Titles feature for this but resist the urge to import a title into the beginning of your video. That’s also a little too “home movie” for news.
Remember, earlier we discussed the option of shooting a still photo with your digital camera so that you would have a thumbnail image that could be used to promote your story. With both iMovie and Movie Maker, you can capture a “screenshot” or a mug that can be used in print to tease to the online video package or on the Web site as a promotional icon.
NOTE: With all computer production, it is important to save often so you don’t lose your hard work should you make a mistake.
Once you’ve produced your video package you’ll be ready to put it online, but first it must be compressed. Talk to your Web staff, if you have one, about their preferred format for video on the Web site. They may have a system in place to process video and serve it in Flash, which allows for greater quality and smaller file sizes. If that’s the case, you can export your file with a much larger file size.
You’ll likely also need someone from the Web site to actually publish the video on the site with File Transfer Protocol or they will give you the directions to do it yourself. (See Chapter 1.)
Mac users: iMovie
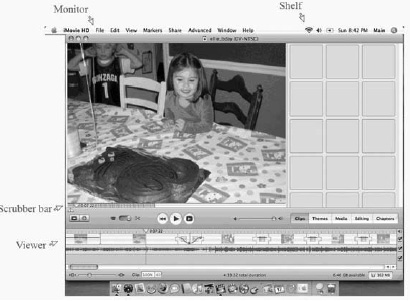
iMovie is a simple yet powerful video-editing program. Here is a diagram of the interface layout.
Once you launch the program, the next step will be to import the video from the camera into the software operation. Here’s how:
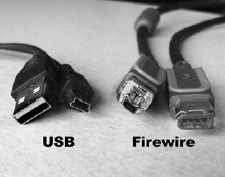 Use a FireWire cable to connect your video camera to the FireWire port on your Mac, then turn on your camera by moving the switch to playback mode instead of camera mode.
- Create a new project by clicking the Create Project button or by going to the File menu and then choosing New Project.
- In the window that appears, type a name for your project. Notice that iMovie automatically saves your project in the Movies folder on your hard drive.
- Use the playback controls in iMovie to rewind to where you want to start importing.
- Click the Import button.
- Watch as short pieces of your video footage, called clips, appear in the iMovie Shelf.
- When you’re finished importing, save your project by opening the File menu and choosing Save Project.
Arranging your clips
Your goal is to edit your clips in the order that will best tell your story. At this point, the Shelf should be full of clips and the Viewer should be empty. To fill the Viewer pane—which holds the movie you are creating—first find the best footage by viewing each of the clips and then dragging the ones with footage you want to use into the Viewer pane.
NOTE: This will move the clip from the Shelf to the Viewer, and you will no longer have a copy of the original clip on the Shelf. So if you make changes to the clip in the Viewer and delete some portions, then change your mind and decide you want to include some of the parts already deleted, you will have to re-capture it from the camera. So it’s a good idea to copy the clips from Shelf to Viewer, thereby leaving an original version in the Shelf in case you need it. This is done easily on the Mac by holding down the Option key while dragging the clip from Shelf to Viewer.
Once you have dragged the best clips to the Viewer, arrange them in the order you want by clicking and dragging. You can change your mind later, but it’s best to have a good idea of how the movie will go before you begin editing down the footage.
Just keep the good stuff
While the filming of a video is important, it’s the editing that will make or break it. So be very choosy when deciding which footage to keep and which footage to delete. Here’s how to delete selected footage from a clip:
- Click the Timeline Viewer button in the iMovie window. This will show the clip’s length in minutes and seconds.
- Select a clip from the iMovie timeline by clicking on it. It will turn blue. A blue scrubber bar appears just below the Monitor area where the clip is displayed. On the top of the scrubber bar is a small gray inverted triangle, marking the point in the clip that corresponds to the picture in the Viewer. This triangle is called the playhead. Move your mouse over the scrubber bar and two tiny triangles appear on the far left that are called crop markers. These are what you use to crop your video.
- Click on the right crop marker triangle and drag it to the point where you want the clip to stop. The playhead also will move to that point in your timeline.
- Click on the left crop marker triangle and drag it to the point where you want your clip to start. Again the playhead will move to that point.
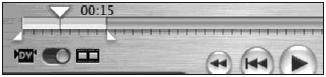 NOTE: The color of the scrubber bar changes from blue to yellow as you drag. You can either delete the yellow area or keep the yellow area, depending on which command you use next.
 - If you want to keep the yellow area, select Edit -> Crop or use the keyboard shortcut Apple -> K. The blue parts of your clip on either end will be deleted and will disappear.
- If you want to delete the yellow area, select Edit -> Clear. The blue parts on either end will merge together to make a continuous clip and the yellow area will be deleted. NOTE: This is why it’s a good idea to copy the clip from the Shelf into the Viewer, so you’ll still have the original footage in case you change your mind or accidentally delete too much. It you want to undo an edit, simply select Edit -> Undo or use the keyboard shortcut Apple -> Z.
Now move on to the next clip and repeat the steps, eliminating the excess footage and keeping just the best parts. iMovie will make the clips play continuously as if nothing was cut.
Royalty-free music
Be careful when adding music or other audio to your project as most music features restrictive copyrights based on a royalty payment system. In order to use that Radiohead track for background on your video story, you would need permission from the band’s recording company and must pay a royalty every time the music was heard by a reader/viewer.
So look for royalty-free music, which allows you to pay one low price for a piece of music and receive the right to have it played with your project as many times as needed without additional cost.
Apple’s GarageBand software (www.apple.com/ilife/garageband) makes incorporating audio easy and comes with 200 sound effects and 100 jingles that are royalty free. You can also purchase GarageBand Jam Packs that feature dozens more tracks separated into musical genres such as world music, symphony orchestra and “rhythm section.”
The audio channel on the Creative Commons Web site (creativecommons.org/audio) features links to artists and resources with royalty-free—and sometimes totally free—music available. You can also search for royalty-free music on the Internet and find Web sites that sell a dizzying array of studio music with affordable, royalty-free prices.
Working with audio
You can adjust the volume of your audio or add music or narration to your video. Here’s how with iMovie.
To adjust audio levels: Although this may be too advanced for most beginners, iMovie allows you to change the volume on the audio for the entire clip or any section you want to be louder or quieter. To experiment, go to the View menu and then select Show Clip Volume Levels.
The thin purple line in the middle of the clip is what you edit. Click and drag the line higher if you want the audio in that part of the clip to be louder, or drag the line lower if you want it quieter.
Using narration: You can record a voice-over quite easily using your Mac. First, write out the script and practice reading it a few times. Then click the Media tab on the iMovie interface and, when you’re ready to record, click the red circle button next to the word Microphone.
Read the script into the built-in mike on the computer or, if possible, use an external mike. This is recommended, but many computers don’t have a place to plug in a mike. If yours does, it will either be in the back near the speakers/headphones jack or, if it’s a laptop, on the side or back.
Import your narration into iMovie with the same process described earlier.
To import audio: iMovie can easily add a music file to video, as long as it’s an MP3 and is already imported into your iTunes program. Just click on the Media button and select the track you want.
NOTE: Be aware that, unless you have rights to commercial music, you can’t use it in your video. GarageBand, Apple’s music program, which should also be installed on your Mac, features many royalty-free music tracks that can be used as lead-in or lead-out background music.
Adding transitions
Most news videos use very few transitions, such as fading into/out of a shot, to control how one clip evolves into another. However, a few of the basic transitions might come in handy, and you can test how a transition will look in your video. Select a clip that you want the transition to start from and click on the Editing tab, then click Transitions. A menu of available transitions will replace the window where the Shelf was. Select a transition and a preview of it will play so you can see how it will look.
To add it to your video, simply drag it from the menu area into the timeline between the two clips you want to be transitioned. If you reconsider later, simply select the transition in the timeline and hit Delete.
Adding titles
It’s often necessary to identify speakers in your video, or you may need to publish credits at the end. Use the Titles feature to do this. To add a title:
- Select the clip where you want to add the title.
- Click the Editing tab, then click Title and a menu of title styles will appear where the Shelf was. Select the title that you want and enter the textual information into the box. A preview of the title will appear in the viewer.
- Modify the font style and size with drop-down menus.
- Modify the effects using the pre-set options but, again, keep it simple and professional (no flying words).
- Modify the color of the text by clicking the box next to the word Color and making a selection from the palate.
- Opt for your title to appear on a black background, rather than superimposed over the video, by clicking on the small box next to the words Over Black.
- Check the small box next to QT Margin, since you will eventually export your video as a QuickTime movie, and this will make the title fit in the margins of the QuickTime movie.
- Optional: You can adjust the speed or duration of the title by dragging the blue button in the sliding Speed bar near the top. Drag to the left to shorten the time your title will appear on a clip or to the right to increase the duration of the title.
Now add the title to your video by dragging it to the timeline just before the clip where you want the title to display.
To delete a title, click on the clip that contains the title and in the menu at the top select Edit -> Clear. That will delete the title but won’t affect the rest of the video.
Using still photos
At some point, you may find that your subject has photos that would help tell the story, or a photographer has shot some stills that you want to use in your video. No problem. Simply add the photos into the iPhoto Library on the machine you’re using to make the movie, then click Photo from the special menu below the Shelf area. (Note: The photo must be in JPG format.)
Find a thumbnail for the photo in the menu and select it. Before adding it to your video, adjust the time the photo will be displayed with the slider bar in the Viewer menu. You can also use the zoom tool for a closer look at the photo, or click the box next to Ken Burns effect to make the photo “pan and scan” during the movie. (You can control how much “pan and scan” will occur with the Start and Finish controls.)
When you have the photo set the way you want, drag it to the timeline and place it where you want, just like you did with video clips.
Grabbing screenshots
To capture a still image that can be used to promote your video package, find a spot in the video that would lend itself to a small, iconic image by moving the playhead to that location. Then under the File menu at the top of the screen, select Save Frame As …
Choose JPG from the Format menu and navigate to your Desktop folder (or one that you’ll remember) and click Save.
Exporting video for the Web
By default, video files are too large to publish online without compressing, even with the proliferation of broadband connections. So the final step in producing your video story will be exporting it for online publication.
Save your project one more time to be sure you have all the changes. The export process will produce a compressed copy of your file but it will not alter the original.
Since you’re using iMovie, the export format of choice will be QuickTime. Under the Share menu on the top of the screen, choose QuickTime. You will be presented with a drop-down menu with several options. Web or Web streaming are probably your best bets, although compressing and exporting video files for the Web can be more art than science.
Read the fine print as you toggle between selections and note the approximate file size. This is the information you’ll use to make your decision. As a general rule of thumb, the file size should be no more than 1MB for each minute in length, meaning a three-minute video should be less than 3MB.
If you are running your own site, it’s probably best to select one file format to use for all of your downloadable videos. If you are part of a news organization, talk to your Web staff about their preferred format for video on the Web site.
For PC users: Windows Movie Maker
Like iMovie, Windows Movie Maker is a simple yet powerful video-editing program. The interface has four main areas: The Taskspane, the Collections, the Preview Monitor and the Timeline. Here is a diagram of the interface layout:
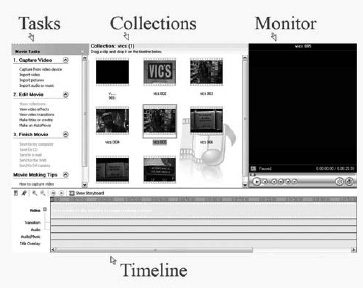
Like iMovie, Windows Movie Maker is a simple yet powerful video-editing program. The interface has four main areas: The Taskspane, the Collections, the Preview
Monitor and the Timeline. A diagram of the interface layout is on the previous page.
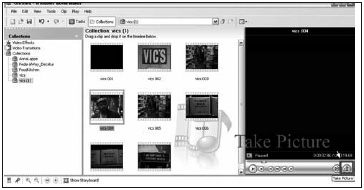
Once you launch the program, the next step will be to import the video from the camera into the software operation. Here’s how:
- Use a USB cable to connect your video camera to the USB port on your computer, then turn on your camera by moving the switch to playback mode instead of camera mode.
- Click “Capture video from camera” link in the Tasks pane. (See example in diagram above.) If you don’t see the link, expand the menu under the 1. Capture Video label. The software will automatically recognize the camera through the USB connection and begin importing the video.
- The clips appear in the Collections pane.
- Once the import is finished, save your project. Select File -> Save from the menu at the top and type a name for your project. Notice that Movie Maker automatically saves your project in the My Movies folder under My Documents on your computer. You can modify this if you’re so inclined.
Arranging your clips
Again, you’ll want to arrange your clips in the order that will best tell the story. At this point, the Collections should be full of clips and the Timeline should be empty. To fill the Timeline pane—which holds the movie you are creating—first find the best footage by viewing each of the clips and then drag the ones with footage you want into the Timeline pane.
Once you have dragged the best clips to the Timeline, arrange them in the order you want by clicking and dragging. You can change your mind later, but it’s best to have a good idea of how the movie will go before you begin editing down the footage.
Just keep the good stuff
While the filming of a video is important, it’s the editing that will make or break it. So be very choosy when deciding which footage to keep and which footage to delete. Here’s how to delete selected footage from a clip:
- Click the Show Timeline button in the Timeline window. This will show the clip’s length in minutes and seconds. (Note: the button you just clicked now reads Show Storyboard and you can return to the previous view by clicking it again.)
- Select a clip from the Timeline by clicking on it.
- Find the spot on the video where you want to trim an end off, then under the Clip menu, select Set Start Trim Pointor Set End Trim Point, depending on whether you want to chop the front of the clip or the end. Note: You can also hover your mouse on the end of the clip that you want to trim. The selection pointer will become a red icon with two arrows. Click and drag the red arrow over the area you want to delete.
- If you want to delete a portion of the middle of a clip, you first need to split the clip so the part you want to delete is on one end. Do this by moving the playhead to the beginning or end of the portion you want to delete, then under theClip menu, select Split. Now you can repeat Step 3 to remove the footage.
Working with audio
As with iMovie, Movie Maker makes it easy to import music files or voice-overs and place them exactly where they’ll have the most impact on your video.
Using narration: You can record a voice-over quite easily if your computer has a microphone input (and you have a mike). If not, you can use the video camera. With the lens cap on the video camera, turn the camera on and begin recording.
In either case, it’s a good idea to first write out the script and practice reading it a few times. Read the script into the built-in mike on the camera or use an external mike.
Narration with a built-in mike: If you have a desktop computer, the input port for the mike is likely on the back of the machine (real convenient, huh?). If you have a laptop, it likely will be on the side. Once the mike is plugged in:
- Click the Tools menu in Movie Maker, and then click Narrate Timeline.
- Under Narrate Timeline click Start Narration.
- Speak normally into your microphone, and adjust the Input level so that the bar is about 70 percent up when you are speaking. Speak into your microphone as Movie Maker plays your movie. You can narrate your entire movie at once or just one clip at a time.
- When you’re done narrating, click Stop Narration.
- Movie Maker will save your narration as a separate file. In the Save Windows Media File dialog box, type a name for your narration. Then click Save.
- Click Play in the Preview Monitor to watch your movie and listen to the narration.
- If the narration is too loud or too soft in comparison to the movie, right-click the narration on your timeline and then click Volume.
- In the Audio Clip Volume dialog box, move the slider to the left to make the narration quieter or move it to the right to make it louder. Then click OK.
If the timing is off or you stumble and mumble through one part or another, you should re-record it. To delete narration so that you can do it over, right-click the narration on the Timeline and then click Delete.
To import audio: If it’s easier to record narration with a different device, such as a portable digital recorder, you can import the audio and combine it with your video. Edit the audio clip so it has just what you want—you can do some trimming in Movie Maker, but it’s better to do the bulk of the editing in a separate program. Once you have what you want, follow these steps:
- Under the Capture Video menu on the left, click Import audio or music.
- Choose the file on your computer from the file browser. Almost all audio file formats are allowed, but MP3 is still preferred. Make sure the Create clips for video files option is checked.
- Find the audio file in the Collections window. Click and drag it to your timeline, placing it under the section of the video where you want it to go.
- The clip will land on the line below the video marked Audio/Music. You can move it forward and backward by clicking and dragging it (when you hover your cursor over the clip it turns into a hand icon).
- To trim the ends, click on the small triangle on either the beginning or the end and drag the end into the clip.
Adding transitions
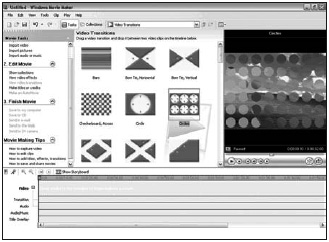 Most news videos use very few transitions to control
how one clip evolves into another. However, a few of the basic transitions might be useful.
- Under the Edit Movie menu on the left, select View video transitions and notice that the Collections menu is now filled with blue shapes with names like “Bars” and “Circles.” (See diagram.)
- Select a transition to preview, then click Play in the Viewer to see what it looks like.
- Once you find the one you want, find the place in the video where it should go. Then drag the transition down to theTimeline to the correct location.
If you reconsider later, simply select the transition in the Timeline and hit Delete.
Adding titles
It’s often necessary to identify speakers in your video, or you may need to publish credits at the end. Use the Titles feature to do this. To add a title:
- Select Make titles or credits from the Edit Movie menu on the left.
- Choose from the five options presented on the next screen, ranging from “title on the selected” to “credits at the end.” Note: If you didn’t move the playhead to the location in the video where you want the text to go, you can move it now.
- Enter the textual information for the main title into the top box and subhead information into the bottom box (if desired). Movie Maker has dozens of text options, but very few work for a news video and the best one only works with a one-line title. So if you need a name and title, enter it on one line like “John Doe, President, XYZ Co.”
- Click Change the title animation and select Subtitle from the menu.
- Next, click Change the text font and color and modify the size, font, color, position and transparency of the text. Again, since this is a news video, keep it simple and professional.
- Click Done, add title to movie.
To delete a title, click on the title as it appears in the Title Overlay line of the Timeline view and hit Delete. That will delete the title but won’t affect the rest of the video.
Using still photos
At some point, you may want to use still photos from your subject or shots from your photographer in your video. No problem. Simply add the photos to the computer you’re using for video editing, then click Import pictures from the Capture video menu on the left.
Find the photo in the file browser menu and select it. Make sure the Create clips for video files option is checked. If it is, the photo will appear in the Collections area and you will be able to drag it into the Timeline from there, placing it exactly where you want it in your movie. By default, the program will set your picture to show for five seconds. If you want to add or subtract time to the picture, click on the arrow on the side of the picture and drag it to the right (for more time) or left (for less).
Grabbing screenshots
 If you need a “screenshot” or a mug to promote your video in print or online, you can easily capture one. Find a spot in the video that would lend itself to a small, iconic image by moving the playhead to that location. Then under the Tools menu at the top of the screen, select Take Picture from Preview. A file browser will appear, allowing you to select the location on your computer where the thumbnail image will be saved. (The Desktop is a handy location for temporary files like this.) Then click Save.
Exporting video for the Web
By default, video files are too large to publish online without compressing so the final step in producing your video story will be exporting it for online publication. Save your project one more time to be sure you have all the changes. The export process will produce a compressed copy of your file but it will not alter the original. Since you’re using Windows Movie Maker, the export format of choice will be Windows Media. Under theFinish Movie menu on the left of the screen, choose Save to my computer. A pop-up window will present a “wizard,” which will step you through the rest of the process. Here are the selections to make:
- Enter a name for your movie.
- Choose a location on your computer where you want to save the file.
- Click Show more choices on the next screen (titled Movie Setting).
- Select Best fit to file size and enter a maximum size in Megabytes (MB). A good rule of thumb is 1MB for each minute of length in the movie, so a three-minute movie should be no larger than 3MB.
- Click Next and the software will export your movie to the location you specified.
Assignment:
- Think of a short story you would like to tell with a video. It could be a Little League game or other youth activity, a weekend trip or, if you want to do something “newsy,” a press conference or a public meeting.
- Think of about three to six clips of video that would tell the story, mixing wide, medium and close-up shots. Then shoot the clips with a camera.
- Capture the video into a computer that is equipped with iMovie or Windows Movie Maker and save it to the hard drive.
- Edit the clips together to make a movie. Add voice-over narration, music and transitions.
- Then output the video for display on a Web page.