Introduction
A challenge for many reporters is to capture in words a story’s particular sights and sounds. Photographs usually solve the visual end of this equation. Now, with the advent of cheap digital audio recorders, reporters can bring readers even closer to the story by enhancing their reporting with audio clips.
The basics: Audio formats
It’s helpful to have an understanding of digital file formats as you get started. If you download or listen to audio on a Web site, then it is probably in a compressed format so that it downloads faster. You’re probably familiar with some of the formats, like MP3 and Windows Media. It’s not necessary for you to know the technical differences between them, just know what you’re dealing with. Here’s a glance at the most prevalent formats of digital audio.
Compressed (on Web sites)
- MP3 (most universal)
- WMA (Windows Media)
- Real (Real Audio)
- MPEG-4 (QuickTime)
- MPEG-4 AAC (iTunes)
Uncompressed (not found on Web sites)
- WAV (pronounced “wave”)
- AIFF (Apple’s standard format)
Your goal should be to provide audio clips in MP3 format for your readers. Why? Because virtually any computer can play an MP3. Programs like iTunes, Windows Media Player or Real Player can play them, too, but they can’t play the other proprietary formats. For example, you can’t play a Windows Media file in iTunes or a Real Media file in Windows Media Player, but you can play an MP3 on any of them.
Identifying opportunities
If you are a reporter, interviewing people is what you do. Sure, you can transcribe the best quotes for print but does that really provide a thorough and complete report? Did one of your sources elaborate on an important topic, which you then paraphrased to avoid a long quote? Did someone say something with emotion or feeling or uniqueness that doesn’t transfer to text?
Most news articles can be improved with the addition of audio clips. A newspaper reporter can easily produce audio clips on more than half of the stories he or she turns in, based on the subject matter alone. That may sound too ambitious if you haven’t edited and published audio for the Web before. But once you do it a couple of times, it will become second nature.
The first step is to toss that microcassette machine from the 1990s and get yourself a digital recorder.
Buying a recorder
Like most digital tools, there are plenty of options on the market today and deciding which one is right for you starts with a basic question: How much can you afford to spend? You can buy a new digital recorder for as little as $50, but if you spend even a little bit more you can dramatically improve your capacity to participate in this game. And, of course, if you spend even more you will go from “entry level” to “professional” in no time.
The key points to consider include recording time, digital file format and compatibility with your computer, ease of use and transferring files, and quality of recording. Let’s look at a few options in different price levels and evaluate them on these aspects.
Important note: You might be tempted to buy a $50 version because, hey, it says it’s a digital recorder. But unless you can transfer the files from the recorder to your computer, you will be unable to get the files onto a Web site where readers can listen to them. So it would be like writing a story on a computer and not being able to send it to your editor.
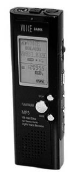
$100 – Olympus WS-100
 Recording time: Up to 27 hours. Unit is also a USB mass storage device with 64MB of capacity.
Digital file format: Windows Media, which isn’t perfect (especially if you’re a Mac user) but does work.
Compatibility: Files can be quickly downloaded onto a Windows or Mac computer through a USB 2.0 port. If you have a PC you won’t need any additional software. If you’re using a Mac, you will need a file converter to change the WMA files to MP3 or some other format readable on Mac software such as iTunes. EasyWMA is only $10 and works well (http://www.easywma.com).
Ease of use: Recording is one-touch and easy. It’s tiny—about the size of an iPod Nano—so very portable. Has mike and headphone inputs, which are required. It’s clunky to review recordings with fast forward or rewind. This can be done more easily on your computer.
Battery: One AAA battery.
Transferring files: The best feature on this recorder is the built-in USB port. Just pull apart the device and directly insert the recorder into your USB port. No extra wires to pack along.
Quality of recording: As good as it gets for $100.
$200 – Diasonic DR-51128
 Recording time: 35 hours. Unit is also a USB mass storage device with 128MB of capacity.
Digital file format: MP3 or Windows Media.
Compatibility: Windows or Mac.
Battery: Two AAA batteries.
Transferring files: USB connection allows for easy drag and drop of files.
Quality of recording: Good.
$400 – Edirol R-1
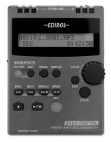 Recording time: 137 minutes when using the included 64MB memory card.
Digital file format: WAV.
Compatibility: Mac or Windows.
Transferring files: USB 2.0 or memory card.
Quality of recording: Excellent.
$350-500 – M-Audio MicroTrack 24/96
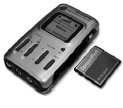 Recording time: Ample, depends on size of memory card.
Digital file format: WAV or MP3.
Compatibility: Mac or Windows.
Ease of use: Simple yet powerful.
Transferring files: Compact Flash (CF) cards make it simple.
Quality of recording: Excellent.
Using a microphone
While using an external mike can be an extra nuisance during an interview, the added sound quality is well worth the effort.
There are basically two types of external microphones: A standard mike with a cord, and a wireless or lavalier mike. Let’s take a look at the advantage both have to offer and also explore the best way to record telephone calls digitally.
A standard mike with a cord is helpful if you are interviewing more than one person at a time or you want to include your voice on the audio clip so listeners can hear the full interview instead of just selected quotes. It is also the best way to gather natural, or environmental, sound, which can be spliced into the audio segment to enhance the listening experience.
Gathering natural sound is not the same as background noise. Interviews should be done in a setting that allows the voices to be recorded without interruption. Separate from the interview session, however, it’s always a good idea to search for those sounds that will help describe the setting. Are there power tools being used? Is it a noisy office with lots of chatter and phones ringing? Is it an outside setting where you can hear the bugs and the birds?
If there is natural sound to be had, take just a few minutes and record it—without anyone talking. “You might feel silly just standing there holding your mike in the air, but when you get back to edit your stuff, you’ll be glad you have it,” said Kirsten Kendrick, a reporter and morning host on KPLU radio, an NPR affiliate in Seattle and Tacoma.
You should record natural sound in uninterrupted 15-second increments. That way you’ll avoid the problem of not having enough to use in editing. You can always make a clip shorter by cutting it but you can’t make it longer, so make sure the material you’re working from is long enough to cut from.
Assignment:
Find the NPR station near you or listen online from NPR’s Web site. The public radio broadcasters do a masterful job of weaving natural sound into their reports. And as a listener, you get a better sense of the setting for the story when you hear what it really sounds like.
A wireless or lavalier mike is most helpful when your goal is to capture the voice and words of one person and you’re “in the field.” While they might be intimidating at first, wireless mikes are really very simple.
There are two halves: A battery pack and miniature mike on a cord that clips on the person you want to record (this sends the signal), and a battery pack and cord that goes into your recording device (this receives the signal).
Here’s how to get started:
- Clip the mike on the lapel of your subject and give them the battery pack to put in their pocket. Don’t forget to turn the device on!
- Connect the receiver pack to your recording device, turn it on, and put it in your pocket or purse or handbag. Then operate your recorder as you normally would: Hit the record button when you’re ready and pause button if there’s a break in the action.
Recording with your computer
To record a phone call digitally, you’ll need another piece of equipment: A telephone recording control unit that sells at Radio Shack for $25. Many journalists already use one of these to record phone calls to their analog microcassette tape recorder. And those same journalists probably have an unruly jungle of tapes on their desk or in a drawer that is unlikely to produce the tape from six months ago that someone might need. (NOTE: In some states it’s illegal to record someone on the phone without their express permission.)
That’s one reason to go digital—organization. With the Radio Shack device you can record directly to your computer, which makes it easy to store files in an organized fashion. And going through the “tape” is easier on a computer since most playback programs like Windows Media Player have slider bars that allow you to quickly go from the beginning of a recording to the end.
Your hardware is ready. Now you need software to manage and edit the sound files with your computer. There are literally hundreds of options for audio software, ranging from Adobe Audition (the choice for most radio professionals, $349) to Audacity and JetAudio, popular free downloads that work great.
No matter which audio software you use, there are a few basic settings on your computer to check before starting your first recording:
- File name: You will either need to select File -> New and create a file or choose where on your system this new file will be created. Either way you need to think about what to call your file. This is a good time to come up with a standard file naming convention that will serve you for months and years to come. Include the date and the name of the person you’ll be talking to, so an interview on Valentine’s Day with Paris Hilton would be named “021407hilton.” It’s also helpful to create new folders by year or month for more organization.
- Format: You should record in WAV format so your files are uncompressed and, therefore, of the highest quality. You can convert the files to MP3 (Audacity and JetAudio can both do this) once they’re edited for publishing on the Web. You only need to worry about this when recording directly into your computer, not when using a digital recorder.
- Input/Mike level: Make sure the software is set to capture data via microphone input. Then find the setting that adjusts the microphone level and set it to about 70 percent of the possible level.
Assignment:
Now call a friend and record the call for a trial run. Save the file with your new naming convention. Play it back to make sure it sounds good.
Editing your audio
It’s unlikely you’ll ever publish an entire session online. Just like you don’t publish entire interviews in text, you need to edit your audio to make sure the best stuff is not obscured by less compelling, less important or repetitive content. Editing audio is remarkably similar to editing text, so you shouldn’t be intimidated when approaching this task.
First, acquire the audio file if it’s still on your recording device. Connect the digital recorder to your computer through USB and drag the file(s) you need into a folder or onto the desktop. Important note: Most—but not all—digital recorders come with a USB cord that connects to a computer to make this easy (simply plug the cord into the recorder, then connect it to the computer through a USB port). The cheapest recorders, however, do not interface with computers, making them much less useful.
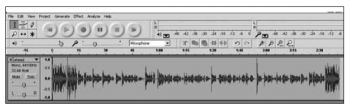
A Sound file ready for editing in Audacity.
Launch your audio-editing software. Ideally, the program should be easy to use and export files in MP3 format. If you use a PC or a Windows machine, Audacity and JetAudio are excellent free options. Let’s go through the editing process with Audacity since it appears to be the most prevalent free software in use today.
Editing with Audacity
- Use File -> Open and open the audio file
- Crop out the bad stuff: Think about how users would best appreciate the content—in one full serving or broken up into smaller bites. Highlight areas that represent unwanted ums, ahs, mouth noises and lip smacking. Then simply hitDELETE. Also crop out silence and any small talk at the beginning and end.
- Make it stereo: Some files will be mono, not stereo, meaning you’ll only hear the audio in one side of your headphones. You want to make it stereo so the sound file will play in both sides of speakers and headphones, instead of just one. To make it stereo, click on the Audio Track label next to an upside down triangle (see screen shot.) Then select Split Stereo Track from the drop-down menu. Then copy the region that you’ve edited by highlighting it and using Edit -> Copy. Then click into the lower window and use Edit -> Paste.
- Export the file: Convert your audio edit into a compressed, ready-for-onlinepublishing MP3. Just go to File and selectExport as MP3. Ignore the meta data interface (Author, Description, etc.) unless you’re doing a podcast.
Assignment:
Record your own voice as a test. Count from 1-10 into a microphone and capture it digitally. Then edit your take. Highlight the section where you say “3” and select Edit -> Cut. Then move the cursor to after the “6” and select Edit -> Paste. Repeat a few more times with other numbers. This will give you a feel for how the sound waves represent words and sounds and also show you how easy it is to edit audio.
Using time points for speed
Most newspaper journalists will do what they know first—use the audio to get quotes so they can write their story before they edit the audio for online publishing. That’s great. But think about the audio editing you will do next as you listen to the entire take. If you make a note of the time when a good quote plays, you’ll save loads of time when you go back to edit the take for the good stuff.
All audio-editing software programs feature convenient time track marks, so if your interview’s best quote occurred 10 minutes into the interview, you write “10:00” next to the quote in your notebook. Then go directly to the 10-minute mark on the track when you’re ready to edit and you’ve saved yourself 9 minutes, 59 seconds.
Ready for podcasting
Podcasting is the distribution of audio files over the Internet using RSS subscription. The files can be downloaded to mobile devices such as MP3 players or played on personal computers. The term podcast, (Playable On Demand + broadcast) can mean both the content and the method of delivery. Podcasters’ Web sites also may offer direct download of their files, but the subscription feed of
automatically delivered new content is what distinguishes a podcast from a simple download. Usually, the podcast features one type of “show” with new episodes available either sporadically or at planned intervals such as daily or weekly.
Podcasting with video files is often referred to as vodcasting (video + podcasting). It works the same, but includes video. If you download a vodcast on an MP3 player that doesn’t have a video screen, you will still be able to hear the audio.
In format, podcasts are similar to conventional radio programming with a host or hosts interviewing a subject, playing music or introducing pre-recorded audio stories. So it’s no surprise that National Public Radio produces some of the most popular podcasts online.
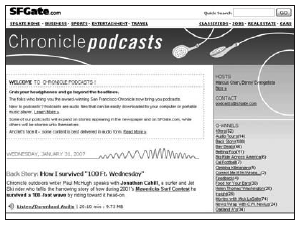
The podcasts homepage on the San Francisco Chronicle’s Web site (http://blog.sfgate.com/chroncast/)
Newspaper podcasts: Dozens of newspapers are podcasting, including The New York Times and The Washington Post. The Naples Daily News produces daily podcasts and vodcasts complete with hired voice talent to deliver lead-ins, sponsorship messages, quick weather forecasts, brief headlines, reporter interviews about a big story, sports headlines, selected letters to the editor, calendar picks and teasers to other items on the Web site (http://www.naplesnews.com/podcasts/).
The San Francisco Chronicle was producing two dozen podcasts as of January 2007 on topics as diverse as the San Francisco 49ers football team, wine and movies.
Listening to podcasts in iTunes: If you have iTunes, finding and listening to podcasts is simple. Just click the Podcasts link in the left menu, then click Podcasts directory on the bottom of the screen. Search by category or most popular. Click Subscribe if you’d like to add a podcast to your collection and it will automatically update any time there is new content.
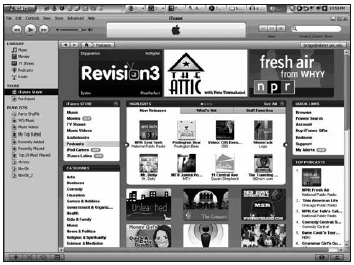
The podcasts menu on iTunes.
Setting up a podcast: If you know you will have regular audio files on a specific topic to offer to readers, setting up a podcast will make organizing and publishing the audio convenient for you and your readers. A good example is a sports beat writer who records interviews with coaches and players and wants to offer them to readers. Setting up a podcast will allow a reader to subscribe and automatically receive new files as they become available.
Creating a podcast that others can subscribe to is easy and free—if you have an RSS feed set up. (See Chapter 2 for how to set up an RSS feed.) Go to iTunes and click on the Submit a podcast logo or use another service like Podcast Alley.
If you don’t have an RSS feed set up for your audio files, talk to your Web staff (if available) or visit http://www.podcast411.com/howto_1.html.